Showing posts with label kawaii. Show all posts

Wednesday, February 5, 2014

Workspace Wednesday: Adventures in (Mathless) Resin!

I wish I could claim the 'mathless' resin description for my own, but I snagged it from a discussion I had with a follower on Tumblr :).  You see... I despise calculations.  I'm a trial and error kind of girl, regardless of the awkward situations I might find myself in as a result.

I've wanted to try my hand at making resin jewelry and accessories for quite some time.  I just couldn't get past the idea of measuring, dividing, adding, subtracting, and possibly wasting an entire batch of resin because I got it wrong.  A few months back, I stumbled across a brand of UV curing resin from Lisa Pavelka.  I ordered it to do some repairs on the default eyes my Kinoko Juice Kiki came with, but I thought it was such an amazing idea.  Curing resin in minutes using a UV lamp.  Of course, this is almost the same thing that you would have applied to your nails in a salon with a gel manicure.  Though, that particular type produces a sticky film that has to be removed with alcohol.

Sadly, both of these options would be incredibly expensive when using in large quantities.  One measly ounce of Lisa Pavelka Magic Glos will set you back about $10.99 on a good day.  UV gel intended for nails varies widely in price, with the cheapest brands being around $2.99+ for a tiny, half ounce pot that goes nowhere fast.

I knew that this couldn't be the only available quantity of UV curing resin.  I mean, it just couldn't be.  So, I buckled down and scoured the internet for a solution.  Finally, I came across Solarez polyester clear casting resin

Solarez Polyester Clear Casting Resin
Solarez Polyester Clear Casting Resin, Quart Jar

This particular resin is almost identical to Castin' Craft polyester resin with one key difference:  It cures in sunlight in three minutes straight from the jar (or you can still use the catalyst to cure the old fashioned way).  I could hardly contain my excitement.  This is a huge quart (32oz) jug o' resin for $23 that I could allegedly pour straight from the bottle with no mess, no waste, and very little curing time.  The same size jug of mix and pour resin costs over 30$ on Amazon.  More money, more waste, and more time.  No, thanks.

The thing is, this stuff wasn't showing up in crafting supplies at all.  It's marketed purpose is to seal things like surfboards and paneling.  I double checked the MSDS sheet against other popular crafting resins and could find no significant health related differences.  As with most resin, the fumes can be pretty stinky and you don't want the uncured product on (or in) yourself.  I'm used to working with a respirator and gloves, so this isn't really an issue for me.  I have a huge fan and a glass sliding door that I can open fully to properly ventilate while working inside.   

Always, always, always make sure to use the appropriate protective equipment when working with hazardous materials!  Crafting is fun, but safety is first!  A dust mask won't cut it, you need a NIOSH approved respirator.  Polyvinyl gloves and goggles are a great idea, too.  Pretend you're Heisenberg and craft at your own risk.

So, how does this stuff hold up when using it for crafting purposes?  Well, you tell me!  These are some of the pieces I've created over the past two days using Solarez.

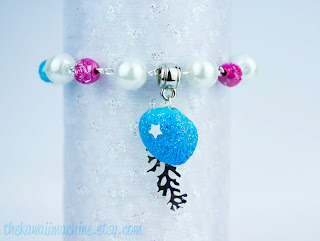
Image of Kawaii Fairy Kei Pastel Goth Resin Jewelry

Image of Kawaii Fairy Kei Pastel Goth Resin JewelryImage of Kawaii Fairy Kei Pastel Goth Resin Jewelry

Image of Kawaii Fairy Kei Pastel Goth Resin Jewelry
Image of Kawaii Fairy Kei Pastel Goth Resin JewelryImage of Kawaii Fairy Kei Pastel Goth Resin Jewelry

 All of these projects (and more) are available in my Etsy shop: thekawaiimachine.etsy.com.

Each piece was blended with dyes, glitter shapes, micro glitter, or real candy sprinkles and poured into polypropolene molds (treated with mold release beforehand).  I cured the pieces using my timed UV lamp (36 watt designed for use with gel nails) and each tray only took about three minutes, though some of the thicker pieces required a bit longer.  They produce a moderate amount of heat while curing, so if you try this method, be careful not to burn yourself.  Because I'm using the UV curing method, I have to stick with molds that are translucent, which allow the UV rays to penetrate into the resin.  Opaque molds will only cure the top layer and leave the bottom in its liquid state.  I was able to dye the resin using the polyester dyes I had on hand with no issues, but you have to be careful about complete opacity, so as not to run into the same issues as opaque molds (not curing thoroughly).

I noticed that with Magic Glos, if I even so much as moved the mold wrong, bubbles would form within the resin that absolutely refused to surface.  With Solarez, if I let the mold sit for a minute or so to 'breathe' most of the bubbles rise and pop themselves.  I can also gently stir the resin within the mold to cause any bubbles caught under the decorations to rise up without creating new ones.  The majority of bubbles that did stick rose up into the flash that would be sanded off anyway.

So, there you go.  Easy to use, minimal waste, and no more hazardous to work with than most other crafting resin.  I'm extremely happy with my results and frankly, I can't wait until the ludicrous amount of molds I ordered arrive today :).


Friday, January 24, 2014

Toy Fiend Friday: Kotobukiya CuPoche Tomoe Mami from Madoka Magica

By now, you should know that I have an insatiable obsession for all things Tomoe Mami.  What you might not know is that I'm also a diehard fan of Kotobukiya.  I've been collecting figures by them since I was a weensy teenager.  When they started releasing their CuPoche line, I was ecstatic!  I can't really get behind collecting Nendoroids because of their horrendous posing, but these little figures are amazing and run in the same super deformed, sugar dripping sweetness aesthetics.

Image of Kotobukiya CuPoche Tomoe Mami
Even the CuPoche packaging is super cute :3.
Mami arrives with three faceplates, several sets of differently posed hands, her guns, a magnetic (!!!) stand and a miniature Witch Charlotte, in her first form.

Image of Kotobukiya CuPoche Tomoe Mami
NO SAD FACES FOR MAMI.  She's suffered enough!

She also comes with a variety of clear plastic clasps and hooks to display the guns and Charlotte.  These can be placed into the pegs surrounding her stand to create different scenes.  Her faceplates are very easily removed, but don't fall out or become loose without a bit of pressure to release them.

Image of Kotobukiya CuPoche Tomoe Mami
AAAAAAAAAAAAAAAAH MAMI NO
There... that's better.  Pardon me while I go cry myself a river into my pillow T_______T.

Image of Kotobukiya CuPoche Tomoe MamiImage of Kotobukiya CuPoche Mami Tomoe

As I mentioned when I reviewed Madoka last year, I absolutely LOVE the magnetic stand.  It's easily concealed under a backdrop.  The magnets in her feet are very strong.  Perfect for say...

Image of Kotobukiya CuPoche Tomoe Mami
Later, dude!
...Punting a particularly evil little witch into the corner where she belongs >_>.

I ordered CuPoche Mami from my favorite figure store, Hobby Link Japan.  She's still available and in stock :).  If you haven't had a chance to check these adorable little figures out, you definitely should!  If you're not a fan of Madoka Magica, there are also several other characters to choose from.

Image of Kotobukiya CuPoche Mami Tomoe and Madoka Kaname

Thanks for reading!


Thursday, January 16, 2014

Super sweet accessories and jewelry with clay molds from Padico


About a week ago, I came across the scratch building section of one of my favorite places, Hobby Link Japan.  I primarily use them for new figure and doll releases and, somehow, it never crossed my mind to browse their crafting goodies.

Air drying resin clay is something I've wanted to try creating things with for a while.  It's super soft, lightweight and dries with a hard, waterproof finish.  The two brands I picked up were Mermaid Puffy and Hearty, though there are other brands available.  I opted to get the white clay because each brand is easily custom colored using acrylics, watercolors, or inks.  I swirled a bit of paint in with the clay for the ice cream scoops to create a marbled effect and kneaded the color evenly to make solid color macarons.

Image of faux clay macarons and ice cream scoops
Faux macarons and scoops of ice cream using Padico molds and Mermaid Puffy clay.
While browsing the clay selection, I also came across Padico molds.  There are two types: soft silicone and hard plastic.  I prefer the silicone because it's much easier to pop out the molded piece.  If you swipe a bit of mold release (or baby oil) onto the hard plastic, the pieces are still very easy to remove.

Image of Padico Silicone and Hard Plastic Clay Molds
Padico Silicone and Hard Plastic Clay Molds
They have all kinds of cute molds available for making breads, macarons, ice cream scoops, cakes, and more.  They're the perfect size for making jewelry and accessories.

Image of Padico Silicone and Hard Plastic Clay Molds
Resin clay Blueberry Ice Cream and Pistachio Macaron, destined to become cute rings!
Padico also makes a decoden whipped creme, but I'm using plain ol' GE white silicone here.  I like the moist look and squishy texture once it cures :3.

I've already added a lot of my recently made items to the shop, which you can check out here.  These are some of the other items I've made for myself and have yet to list:

Image of faux resin clay foodImage of faux resin clay food
 Chocolate creme waffle hair pins, key lime tart hair pins, miniature ice cream cone earrings, and heart macaron rings.

I'm having so much fun making these items.  If I had half as much enthusiasm about making real food as I do for faux food, I'd be dangerous in the kitchen, haha.  Thanks for reading!


Thursday, January 9, 2014

Happy Birthday, Majokko Shop! TINY PANTIES GIVEAWAY!

The Pure Neemo girls' blog over at The Majokko Shop is turning two!  To celebrate two years of magical cuteness, they're giving away some very special underpants :3.

Azone Japan Pure Neemo Gashapon Panties
Tiny pantsu!
These ridiculously cute doll panties are only available at special gashapon machines located within the Azone shop in Japan.  You can check out the details for the giveaway over on the Majokko Shop's blog.  Good luck with your entries and a special thanks to Heather!

Saturday, December 14, 2013

(Kawaii Machine) New Fairy Kei and Pastel Goth Inspired Bracelets: I feel the need, the need for beads!

Oh jeez, please don't leave.  I'm sorry, I wholeheartedly apologize for that title.  It was just... there.  I had to.

Oh, wait, look over there!  It's sparkly, cute, beady things!

For those of you who are still listening at this point, recently I decided that I wanted to try my hand at making custom beaded jewelry for the Kawaii Machine shop. 

In general, I tend to learn as I go.  If I hit a snag, I'll search through a tutorial (or six) to figure out the process.  I had no idea what I was doing, but I had handfuls of this multicolored sparkly stuff and knew I wanted to do something.

kawaii fairy kei watercolor beaded bracelet
Watercolor Butterfly Beaded Bracelet, $8
kawaii fairy kei seashell beaded bracelet
Pearl and Roses Beaded Bracelet, $8
I started out by making linked bracelets.  Each bead is hand linked with the next using silver plated beading wire.  That's a lotta clipping and wire wrapping.  Unfortunately, this also caused a pain flare-up throughout my hands and arms, so these types of bracelets will be one or two of a kind at most.  I simply won't be able to sit down and make very many of them at a time D:.

The next type I tried turned out to be much easier on my hands, and better for people who'd rather not worry about specific sizing.

kawaii fairy kei neon pearl and ribbon stretch bracelet
Pearl and Neon Stretch Bracelet, $4

kawaii fairy kei neon pearl and ribbon stretch bracelet
Paint Splatter and Pearl Key Charm Bracelet, $5
These bracelets are created by laying out a measured number of beads (usually 7-7.5" worth) in a design and threading a loop of stretch cord through.  Much, much easier on my poor hands!   I even made a few of the kind with the grosgrain ribbon for myself :3.  I did, however, have to teach my uncouth self how to tie a proper bow >_>.  Hint:  Use a fork!  For bigger bows, BAM!  Four fingers are basically a fork.

In keeping with the theme of my shop, all of the new pieces are inspired by colors and themes found in both Fairy Kei and Pastel Goth fashions.  I'm always on the lookout for new beads and ideas, so keep an eye on the shop for new items!

Monday, August 19, 2013

The Wonderful World of Acrylic, Spankin' New Accessories

For the past month or so, I've been researching different ways to create charms and jewelry.  I love the look and versatility of printed acrylic.  I've been having loads of fun creating these new goodies.

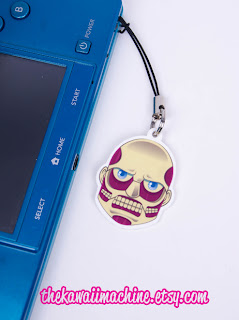
Attack on Titan Colossal Titan Acrylic StrapAttack on Titan Colossal Titan Acrylic Pin
'Pastel no Kyoujin' Colossal Titan Attack on Titan Acrylic Strap and Pin, $5 Each

If you'd told me a month ago that this ridiculous pastel Colossal Titan would be so popular, I'd never have believed you, haha.  Of course I had to make him into some cute accessories!  I've also had requests for this design to be made available as earrings, which I'm currently working on :3.

Fairy Kei Macaron Kitty Hair PinFairy Kei Macaron Kitty Adjustable Ring
 Pastel Pink and Blue Macaron Kitties Hairpin and Adjustable Ring, $5 Each

My Macaron Kitties also received a reincarnation as adorable hairpins and adjustable rings.  I was finally able to find a Hobby Lobby and couldn't resist stocking up on blank jewelry settings and findings.  They also had these tiny grosgrain ribbon bowknots in virtually every color imaginable.  While I'm on the subject, the Hobby Lobby I visited is absolutely huge.  I could have roamed around in there for hours!  It seemed like I was finding something I could use every time I turned a corner.

 Large Pastel Lollipop Candies Adjustable Rings, $5 each

My favorite find, however, has to be these giant pastel candies.  They were originally lollipops with sticks, but I've removed them for the rings and added colorful bows and acrylic stars.  They're coated in iridescent glitter and are actually hollow.  So, even though it's a large statement ring, it's very light.  Making items like these makes me wish I could wear fairy kei every day T_T.

My next acrylic pieces will be Halloween themed!  I've already started designing them and they are absolutely adorable.  Halloween, though, will have to wait until another post!


Sunday, July 21, 2013

Mewclops :3, the Kitty Cyclops

Ready to stare into the soul of onlookers!
Excuse me whilst I flail a bit over here.  I'm a crazy cat lady.  I love cats.  It's no secret.  But a PASTEL CYCLOPS KITTY?  Oh, yes.  Yes, please.

Both the BF and I are feeling under the weather today.  Mine's just coming on and his has a foot out the door (as it usually happens with couples =_=).  I doodled this adorable little guy up in illustrator while I was confined to my chair because the floor wouldn't stop spinning.  We were supposed to be joining some friends for a day of table top gaming, but since we're still newcomers to Nashville, we're catching all of the seasonal bugs (;- ;  ).  I rescheduled for a dolly playdate later this week when I feel better, though!

I've added tees and totes with this design in the Etsy shop <3!


These are printed using two different types of methods.  Flex materials (first and last photo) give a crisp, smooth, and vibrant image on any color.  The result is slightly raised, smooth, and feels a bit like vinyl.  Full color digital prints (like the kitty in the middle) are best on light color shirts and produce a vibrant, smooth image.

The new totes that are available are from Ecobags.  They're made of 100% recycled cotton and are very large.  They'll easily hold more than a grocery bag full of goods.

Mewclops Large Totes, $25
These are printed using the specialty flex materials.  The bottom two are printed with amazing metallic foil flex.  It's a true metallic material with lots of shine and shimmer :3.

I hope everyone had a good weekend!  It's time to get back to the grind again tomorrow (~_~  )!


Saturday, July 20, 2013

New designs at Kawaii Machine

These are a few of the adorable designs I've come up with recently for the Kawaii Machine Etsy.  I have so much fun creating these kawaii shirts and accessories, I can't even begin to describe it.  I'm so happy to have found a local printer that I can rely on for fast turnaround and stunning quality.  Every time I pick up an order, it makes me want to get one for myself XD.   

Aaaand... I usually do ~( .__.)~.

Last week, I was fortunate enough to be able to do a real photo shoot with some of my products. 

Chibi Tiger Blood RAWR Tee, $19
My model, Amanda, was so incredible to work with.  She was kind enough to bring along her lights (she's a photography student, usually on the other side of the camera!) and I remember asking, "What's the Kelvin?"  When I got an immediate answer, I could have melted.  It was a uniquely gratifying experience, haha.  My life may revolve around kawaii, but I'm a geek at heart.

 Butterfly Dreams and Keys to the City Custom Printed Pastel Trouser Stockings, $13

These stockings may be my favorite accessories so far.  They're created from my original designs using a sublimation technique for a vibrant, all over print that won't fade.  The base I use is an extremely soft microfiber blend, perfect for sock skating across shiny surfaces :3.

Galaxy Lucky Kitty Tote, $18
Even tiny Bandit got in on the fun.  I had the pups corralled in the bedroom since we were moving all over the place, but they cried so much that eventually I had to let them in on all the excitement of these new people.  Originally Smokey, our other Chi, was in the bag, too, but he got so excited that I was afraid he'd wiggle out D:!  Luckily, Bandit is easily coerced into a cute photo by saying 'STICK?!' or squeaking a toy :3.

Cookie Bunny Tee, $22
This giant donut has been floating around my studio for weeks.  I bought it especially for the shoot, but I really can't wait to take it to the pool or lake!

For the background, I got a HUGE canvas drop cloth and spray paint in the prettiest pastel and neon colors I could find.  Did you know they make glitter spray paint (as in, it sprays micro glitter, not just a metallic color)?  I DID NOT, but now I do.  We live in a balcony apartment, so it was pretty funny to have this gigantic neon kitty draped over half of our railing to dry.  I had to do some touchups when I was finished and had it hanging inside, though.  The upside is that the fan I used to evacuate the fumes now has a lovely dusting of fluorescent pink on its blades <3.  I still have paint left over, too.  I asked the boyfriend on a scale of one to EVERYTHING, what should be turned pink.  He was nonplussed, but I think it'll grow on him :3.  I loved every second of this shoot and I can't wait to do it again!